All changes and customization must be done at separated environment and tested before they can be applied to public PrestaShop website.
Here I am going to explain on how to setup an WAMP environment on Windows platform.
1. Download WampServer 2.0i
WampServer is an open source project, free to use (GPL licence). Currently stable version is WampServer 2.0i [07/11/09]. It includes following components.
- Apache 2.2.11
- MySQL 5.1.36
- PHP 5.3.0
Please download it from http://www.wampserver.com/en/download.php
You can download it from here : http://www.wampserver.com/en/download.php
2. Run the downloaded installer, and follow the installation guide to finish install.
By default, it will be installed on c:\wamp\
3. Start WAMP Server Manager by double click on c:\wamp\wampmanager.exe
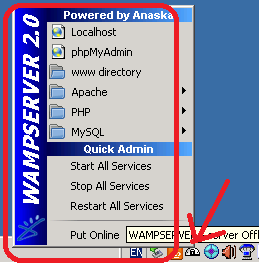
You will see an WAMP server manager appear on the windows right bottom corner.

4. Start all service by clicking "WAMP server manager" - "restart all service"
5. You are all set, everything is ready.
Please access http://localhost/phpmyadmin/
So far, your web server are only accessible from local machine by http://localhosst/,
if you want to access your web server from other computer by IP address or hostname,you will encounter error "Forbidden - You don't have permission to access / on this server."
you will need to have make some change on on the configuration file to allow access your WAMP server from other computer.
6. Make your WAMP web server accessible from other computer.
6.1 open file C:\wamp\bin\apache\Apache2.2.11\conf\https.conf
6.2 look for following code
<Directory "c:/wamp/www/">
....
Order deny,allow
Deny from all
and change the two line bottom two lines to
<Directory "c:/wamp/www/">
....
Order allow,deny
 Allow from all
6.4 Restart all service of your WAMP server as instructed at STEP 4
By now, you should be able to access your WAMP server from other computer.
No comments:
Post a Comment