Friday, May 27, 2011

PrestaShop Tip - No Carrier Available To Delivery

PrestaShop provide very flexible shipping and carrier configuration. This is a one of very good features. But because of flexibility, it also increase complex of configuration. Many beginner PrestaShop owners show some difficulty on the shipping configuration.

Most frequent see problem is that "No Carrier Available To Delivery". Even you think you have configured the shipping correctly, but you (or your customers) still can not see it on front page.

Here it the check list you need to check if you face the same issue.

What is the issue:
You have figured the shipping/carrier, but it does not show up in front office.
If none of your shipping/carrier shows up, following error will be displayed and your customer will not bale to continue checkout, not able to palace an order at your PrestaShop.

"No Carrier Available To Delivery to this address"


Actually the configuration fields are all there, but you may just missed them because you don't understand. Here are the list.
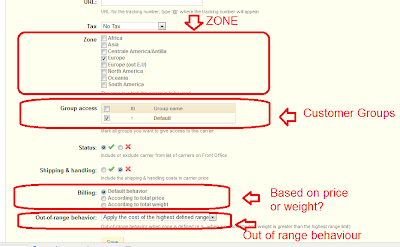


1. Check your carrier status is active.

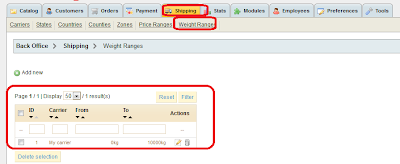
2. Check your carrier serve in the region/area where the address of your customer is in. See the Zone list of above screenshot.

Please note this logic dependence : Addres -> Country/State -> Zone -> Carrier

If user is not logged in, the default country (usually your store location) will be used.

3. Check your carrier serve the customer group which the customer is in. See the Group section of above screen shot.

In PrestaShop, customers can be belong to different customer groups. It depends on your setting. By default there is only one group "Default" and all customer belongs to this customer.

Logic: Customer -> customer Group -> carrier

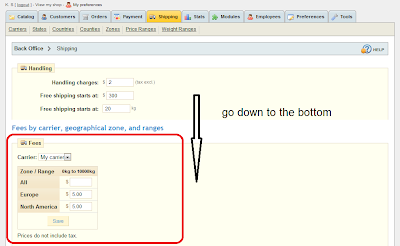
4. Check the billing behavior of your carrier, based on product price or weight. See above screenshot for more detail.

Either way, you will need to set correct shipping price table based on price or weight.


5. Check out of range behavior of the carrier. See first screenshot.
If you set out of ragne behavior to "Disabled", then the carrier will not be available if price or the weight (depends on your setting) go out of range.

If you have checked all above setting is correct, then the carrier should be able serve your customer.

If you find I missed anything, please feedback so that I can add it on.
Saturday, May 21, 2011

PrestaShop Tips - How to remove "Powered By PrestaShop" from your store pages

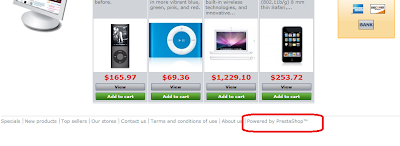
I guess most store owner would like to remove the "Powered By PrestaShop" when your site is launched for production. Here are some of the tip on how how to do that.

Are you allowed to remove the "Powered By PrestaShop"?


The answer is Yes. PrestaShop is under OSL 3.0 license.
You can find more details here : http://opensource.org/licenses/osl-3.0.php

1. How to remove "Powered By PrestaShop" from front page footer?


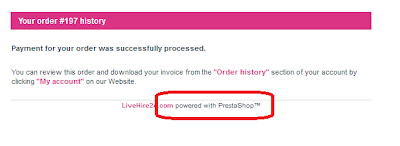
You will have to modify one the theme file (tpl) files, look for "Powered By" and remove related HTML tags and the text.

For PrestaShop 1.3x or lower:
YourSiteRoot/themes/YourSiteRoot/footer.tpl

For PrestaShop 1.4x ot higher
YourSiteRoot/modules/blockcms/blockcms.tpl

if you have customized version of block CMS, then you need to modify following file
YourSiteRoot/themes/modules/blockcms/blockcms.tpl

For 1.4x, you can also remove this from CMS block module in back office.
Back office - Modules - search CMS block - configure - see below footer section:


How to remove "PrestaShop™" from your back office page?


You will need to remove it from following file


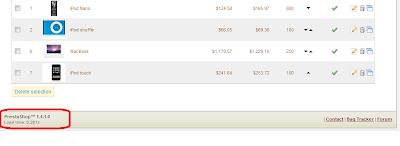
/YourSiteRoot/YourSiteAdmin/footer.inc.php

YourSiteAdmin is the admin folder of your site that you are required to change name for security reason.

How to remove "Powered By PrestaShop" from email templates?


PrestaShop will different kind of emails based on your condfiguration.
All default emmail template include "Powered By PrestaShop". You would like to remove "Powered By PrestaShop" in those emails templates.


Option 1: modify the physical file in following folders

YourSiteRoot/mails/

Please note:
The email templates are organized into different language folders like en, es, fr.
Each email has both HTML and TEXT version.

Option 2: modify the templates though the back office tools

back office - Tools tab - Translations sub tab - choose Email translations


4. Remove " "Powered By PrestaShop"" in other places


If you are using some modules that uses emails, such as mail alerts module, you will also want to remove "Powered By PrestaShop" from those emails too.

The email templates are located in different modules folders.
For example, mailalerts module email templates is under this folder

/YourSiteRoot/modules/mailalerts/mails/

I think above should covered most places, if I missed any, please let me know I will add them on.

Thursday, May 19, 2011

PrestaShop Prepaid Module - Agile Prepaid credit/token module enables one click download/checkout


Features
* User can use prepaid tokens/credit to buy products without going though checkout process, Much easier for user to use your PrestaShop store.

* For downloadable product/online viewable products, user can download/view the products right away by just one click by using the prepaid token.

* As store owner, you are able to control product information display on product detail page, only show some information after user paid for the product item.

You are able set 3 level visibilities of product properties and attributes information at following visibility Level
   - Always visible
   - Always hidden
   - Visible after paid


   Configurable information block
   - Images area
   - Short description area
   - Price Area/Buy block
   - Detail Information area

* User will be automatically redirect to Token packages to purchase or add up tokens it he/she is running out of tokens.

* Number of available tokens is always displayed on top of the page, customer is easy to know and control his token usages.

* Customer will receive an New Order email when he/she used tokens to download or browse a digital service like video/articles by token.

* "Add to cart" button will be hidden automatically one customer paid for the product.


Screen images


1. Customer can see the available tokens at any time. It is displayed on the top of the page. Some sensitive information is hidden before customer purchase the product.


2. After user purchase the product by just one click "Buy Now", the hidden information become available. And an order will be placed at background automatically. An order confirmation email will also be sent to customer.


3. From order history, customer can see difference orders purchased by Tokens and the order that you purchased tokens.


4. Very easy to configure the module.

Wednesday, May 11, 2011

PrestaShop Tips - No payment modules have been installed

For beginner PrestaShp owners, here I introduce some tips on how to trouble shooting "No available payment modules" issue, because I see a lot of store owners raised this issue in PrestaShop forum.

All payment methods in PrestaShop are provided as independent modules. You have to install those modules and configure them correctly to make it available for your customer to choose at checkout.

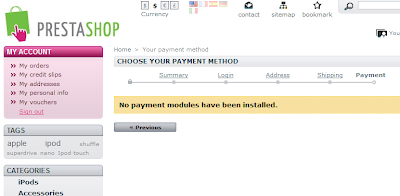
If you don't install and configure the payment module correctly, following error will be displayed to your customers. Or your payment will not show up (displayed) in the list of payment method list.

No payment modules have been installed.


If you encounter this error, you can see the Payment Method appear in the payment method list at checkout, please check following things.

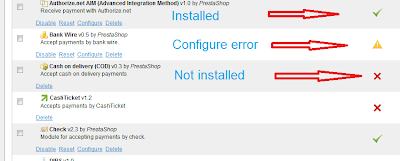
1. Have you installed the module? If have not not yet installed it, please install it. Go back office - Modules - find the module you want to install or configure.

If you can not find your module at Modules tab or the Module is empty.
Please check this post for more details on how to fix it.


2. If it is installed already, then try to check the configuration is correct.
make sure is there is configuration errors or warnings.


3. The module has been configured correctly. That all required parameters are set correctly.

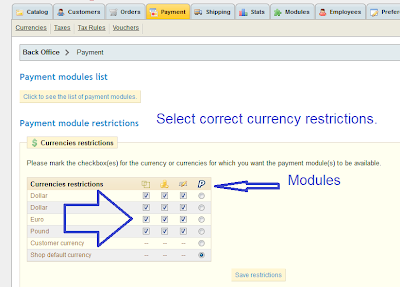
4. Check if payment currency restrictions are set correctly.
Some module require you select only currency, some modules you can select multiple currency.

Back office - Payment tab


NOTE
Even it seems already selected, please also do click the checkbox or radio buttons then click "Save" to make sure.
Some module preset default choice if there is not value set in database, if you don't choose the selection and click save explicitly, it is not set correctly.


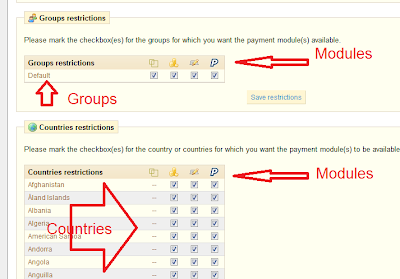
5. Check if the the region (country) restrictions is set correctly.
Some module by default, only set a specific country or no country to use the module. You need to set country explicitly and click save button.


6. Check if group restriction is set correctly.
Modules can be limited to different customer groups.
See above screen for more details.


7. Check if the modules requires some other conditions.
For example, some module requires SSL (HTTPS) environment, if you don't set this SSL in your store, the module will not show up either.

If you set all of those correctly, I think your customer should be able see and choose the payment at front store.

if I missed anything, please feedback and I will add it on.

Thanks

Other reeference
If you are using HiPay, there seems a bug with the version comes with PS1.4x.
Here is forum thread on how to fix it

PrestaShop Tips - Can not find the modules at back office module tab

Many PrestaShop owners claimed that they can not find the module that they are looking for, especially at PrestaShop 1.4 and higher. This is because at PrestaShop 1.4, the modules are arranged in different sections and the by default the sections are closed.

But the in Prestashop 1.4, it also provides a search function to help you find out that module that you are looking for. The problem is that most people missed the search conditions (filters).

Here are few things to check and try
1. Check the search conditions (filters), make sure you have choose to show all modules

All modules
Installed & uninstalled
Enabled & disabled
All countries


2. Make sure your module folder and files physically exist under modules folder at your site

YourSiteRoot/modules/


3. Make sure you have set correct file/folder permissions

folder permission: 755
files permission: 644


4. Make sure there is no errors. If there is any error occurred when you landing modules tab. some modules may not able to be included.

set 'display_errors' to 'on' as following in file YourSiteRoot/config/config.inc.php

ini_set('display_errors', 'on');

For example, following screen shows there is an error in bankwrie.php module at line 43

Thursday, May 5, 2011

PrestaShop Tips - Paypal module security errors

Recently,following Paypal security error are frequently reported from customers.


Making new connection to ‘api-3t.sandbox.paypal.com/nvp’
Connect with CURL method sucessfull
Sending this params:
Send with CURL method sucessfull
PayPal response:
TIMESTAMP -> 2011-05-05T20:19:51Z
CORRELATIONID -> ff812e9242c7d
ACK -> Failure
VERSION -> 53.0
BUILD -> 1878974
L_ERRORCODE0 -> 10002
L_SHORTMESSAGE0 -> Security error
L_LONGMESSAGE0 -> Security header is not valid
L_SEVERITYCODE0 -> Error
PayPal returned error


There are a few cases that error happens, most cases is that configuration incorrectly because of mis-understanding of Paypal module.

The paypal module could run at two different mode:

product mode
testing mode(sandbox)

Paypal requires different account for different environment, that is you must have testing account for testing environment and real Paypal account for product mode.

Here some of the cases of mis-configuration

1. Use testing(Sanbox) account for product mode use
2. Use real paypal account for testing mode
3. Typo of username or password or API signature


Please note:
If you use copy & paste to input username/password/API signature, you may included extra white spaces when copy it.

[Module] - Agile Rotating Banner - PrestaShop module that displays banners on mutiple locations conncurrently, header/top/home/left/right/footer

A new PrestaShop module - Agile Rotating banners is just released.


What is it


It is PrestaShop rotating banner module that allows you display banners in different locations such as Header, Top, Home, Left, Right, Footer of your PrestaShop. Rotating interval and delay time, banner size, title, URL are all configurable.

PrestaShop Compatibility


Compatible with all PrestaShop versions
PrestaShop 1.2, PrestaShop 1.3x, PrestaShop 1.4x

Available banner display locations at your PrestaShop


Features


Features
==========

* You can choose display banners in different location of your PrestaShop, such header/top/left/right/home/footer
  (see below screen shot for more detail of locations)
* You can choose display banner at one or more locations concurrently.
  for example, you can choose to display on left only, or display on both left and right.
  you can choose to display header and right and so on, any combinations.
* You can configure the banner size (width/height) for each location separately.
* You can configure banner rotating interval for each location separately.
* You can configure banner rotating delay time for each location separately.
  This could avoid the multiple banners switch images the at the same time.
* There is no limit on the number of images for each location.
* Each banner image could have its own title (for search cache key words), URL.
* Data is saved in XML file so you can manually FTP the images and edit the file directly.


  Save your time to upload one by one.


* You can also use for video. For example, you can use YouTube video as URL


Module configuration screen